
Although the overall tone and playing characteristics of the instrument will not be affected, a high quality finish will be a real source of pride. The more time you spend on the finish, the better the final outcome. Usually we find that the desired outcome is not exactly as you might have imagined before the project begins, but the end result is still always something to be admired.
Both the neck and body of your Electric Guitar Kit have been sealed, sanded and are ready for final finishing. If you would like to do further sanding, please use a light abrasive sand paper. We factory apply a fine coat of sanding sealer to avoid warping whilst in transport. If you would like to add more you can do so but it is not necessary. If you are airbrushing and you find the wood is absorbing the paint before it has a chance to dry, then you may want to consider adding more sanding sealer.
First you will need to decide whether you would like a natural finish or a paint finish (see here for more info) on the body.
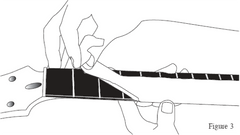 Seal The Fretboard Before the application of the finish, the fingerboard should be masked off to prevent the finish from adhering to the fretted surface. A screw can be inserted temporarily in one of the four holes at the heel which will later be used for attaching the neck to the body (Bolt-On Neck only). Secure a wire or cord to that screw so that the neck can be hung during spraying. The fretboard should be free of paint or sealant at all times. The only product you should ever apply to the fretboard is Lem Oil which is used to nourish the fretboard and prevent cracking.
It is also recommended to use masking tape to seal the neck cavity of the body (where the necks fits in) as well as part of of the neck that fits into the body. The build up of sealant may prevent the neck from sitting in the cavity as it should. It is ok to stain these areas though as stain is absorbed into the wood and does not form a layer on top of the wood.
Option 1: Natural Finish
With a natural finished guitar you can see the grain of the wood through the finish. With a colour finish you lose the effect of the grain once its painted over. In order to achieve a natural finish, you would:
1. Need to decide on the colour you would like the wood to be
2. Seal the wood to avoid any UV/Water damage as well as protect from bumps and dents.
If you are happy with the colour of the supplied wood then you can skip straight to the clear coat The clear coat will add a gloss to the current state of the wood and will most likely darken its appearance as well as pop out the grain.
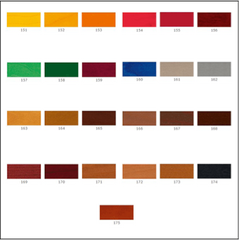 In most cases customers elect to change the colour of the wood to a Mahogany as an example. You can choose a variety of different colours. The product we recommend is a wood stain produced by CLOU. You can find it here. There are a variety of different colours you can choose from. To apply, you simply follow the instructions on the back of the packaging, then apply the mixture generously to the wood using a sponge or old rag. You will immediately see the colour of the wood change. If you use less water then advised you will achieve a darker shade and with more water, a lighter shade. Its best to practice on a scrap piece of wood with a similar tone before moving to your guitar.
Sealant:
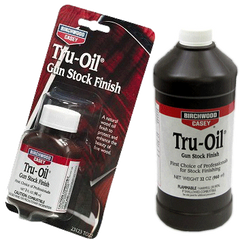 The sealant is used to lock the finish in and protect your guitar from UV, Water, Bumps & Dents etc. The sealant is the last step in the process. Move to it only once you are happy with the look of your guitar because you cannot undo or re-do the finish once the sealant is applied. The best finishing product we can recommend for a natural finished guitar is Tru-Oil (find it here). It is an American product manufactured to finish the butt stocks of guns, Like butt stocks a guitar is also only wood. Tru-Oil is hard to find and certainly one of the best products on the market (a good alternative is a Danish Oil).
Tru-Oil is liquid product applied directly to the wood. It runs smooth, had a gloss finish and dries hard. It also hardens over time. You can get away with using a 90ml bottle for 1 guitar (should get about 2, max 3 coats) but a 240 ml is recommended if you’d prefer more coats. The more coats you add the glossier the guitar will become. There is no wrong or right though, only personal preference.
*Note: There are a variety of products you can use i.e the Woodoc range is also very good. The above are only the products we recommend. Chat to someone at any good hardware store to get an idea of whats available.
Option 2: Colour Finish
A colour finish guitar is where you paint over the wood thus losing the effect of the wood. This will give you a broad range of colours to choose from and you can also get creative with the finish. You will need to first decide on your finish, and then the sealant used to lock it all in and protect the finish. Here are just a few creative ideas being explored in the guitar world:
1: Swirling
2: Decoupage
3: Sunburst
“Forget your guitar is a guitar, treat it simply as a piece of wood”
There is a vast variety of different paint types and brands that you can use to finish your guitar. For the colour coat your first stop is a good hardware store. We recommend DIY Depot or Jack’s Paints but any will do. An acrylic lacquer is particularly well suited to your needs. In addition to providing a full range of colour choices, acrylic lacquer is extremely durable and resistant to cracking.
Chat to the paint specialist, tell them what you are looking to do with your guitar and they will advise accordingly. Decide whether you want a brush applied or spray applied. Spray applied is prone to drips and runs whereas brush applied is prone to brush marks. Either works though. Cost wise, brush applied will be cheaper but only marginally.
Great spray brands include Chem Spec, Rust-Oleum & Spray Mate.
A primer is not necessary although it is more professional. It will be required if you plan on doing any pencil artwork on the guitar before sealing. Primers are available in either white or pink and will ensure the true colour of the paint you choose is reflected on the guitar.
Choose your colour from the many available shades including metallic options.
Before you begin, ensure that both the part of the neck that fits into the body, as well as the cavity on the body that the neck fits into are both completely sealed off with masking tape. You don’t want any clear or colour lacquer or any other material on these sections. They must fit wood-on-wood. The reason is, the fit is already so snug, that any lacquer might prevent the neck from fitting into the body properly and if it is a Set-In neck, the wood glue will have a far better bond on wood rather than on lacquer.
You do not need to worry about covering the pickup cavity’s or knob-holes as a rounded file will aid you later in the unlikely event that components do not not fit as a result of the lacquer.
Hang the body as shown in Figure 1 below. Begin each spray (or brush stroke) in the air on one side of the body and continue until you reach the air on the other side. Overlap each stroke by one half, and every other stroke spray crosswise, then length wise. This technique will provide an even colour distribution.

Although lacquer dries quickly, and successive coats may be sprayed in a short period of time, attempts to spray too much in one coat can result in runs or bubbles in the finish. Spraying should not be attempted on excessively humid or rainy days.
One or two coats of colour should be enough. It should not be necessary to sand between coats unless there are drips, runs or bug feet to be levelled. All exposed surfaces should be dead level and have a nice satin gloss.
Spray all exposed surfaces evenly. The neck of your Guitar has been sealed so it should not be necessary to sand between coats unless the paint runs, orange peel or drips appear. Use the same procedure that you followed on the body – again, two or three coats should do the job. Final rub out and polishing takes place about one week later when the lacquer has cured.
Sealant:
It is advisable to also choose the sealant manufactured by the same company who’s paint you chose for the colour finish. They often work well together. Sealants are usually available in matt or gloss depending on your preference.
*Note: Avoid using wood varnish as a sealant as it generally quite sticky and needs to be re-applied every 1 to 2 years or so. Look for a permanent solution i.e a wood sealant.
The clear coat is applied to the body (once the paint is dry) using the same technique as described for the colour coat. Two or three coats of clear should be adequate. You can use as many as you like though.
For best results the body finish should be allowed to harden for one week before the final rub out and polish.
*Note: The Bindery on the guitar body must be taped off to prevent overspray from the finish. To avoid runs and drips, hold the spray can 6-10 inches from the guitar surface. For the best results follow the directions on the spray can.
Final Rubbing & Polishing
After allowing the clear, lacquered surfaces to dry and harden for at least one week, sand lightly with non-loading #400 sandpaper. During sanding be sure to place firm material behind the sandpaper. A large rubber eraser works fine. The eraser is flexible enough to sand the gradual curves but is stiff enough to prevent the sharper edges (of the headstock, for example) from being rounded off. Be sure to sand with the grain of the wood.
All sanded surfaces should now be a bit dull, indicating that the finish is flat and level. Now repeat the sanding process with very fine #600 sandpaper using water and a small amount of dishwashing detergent as a lubricant. This will remove any sanding marks left by the previous step and leave all surfaces a dull gloss.
The finish can now be rubbed out using a medium grade rubbing compound (Dupont White Polishing Compound is a good choice). The compound should be used sparingly with fair pressure at first –– as a high gloss develops, pressure should be diminished. An extra fine grade of a polishing compound may be used to get that final bit of gloss. You should now have a professional quality finish. You can protect your work with a light wax – Dunlop Polish is a good choice.
![]()
What an informative and helpful article I can definitely use this for future
Awesome DIY Kits and great quality bodies and necks.
The Tele bodies have been featured in this telecaster buyers guide: http://guitarpickzone.com/telecaster-body/
Thanks!
Justin